Hellow cool people who read my blog :D
A friend told me about paper-cutting art and it sounded fun so I decided to try make some pictures of everybody's favorite superdude, Iron Man :D
I took step-by-step photos of the first one so you can see how to do it :)
*Some of the photos are horrible quality. Sorry, my camera was new*
 |
| I started by downloading a whole bunch of Iron Guy images. Then I Photoshopped them until I was left with pictures made of very basic shapes, with very few colours or shades of black and white. I chose the picture above for my first ever attempt at papercut art because there's not much detail in it. |
 |
I printed the pictures on A4 paper and then got supplies together:
rubber cutting board
art knife with a snap-off blade
pencil and eraser
masking tape
tracing paper.
cardboard and paper | |
|
 |
| I traced the Iron Man mask |
 |
| And labelled it according to which pieces should be cut from white paper |
 |
Then I traced the correct shapes onto each colour of paper, cut it out and glued the shapes and layers in place.
Pretty simple. |
I wanted more contrast between the
white and grey so I re-did the whole thing from scratch, using darker
grey paper, as you can see below
From here on I only took a few pictures of what I was doing since you're probably sick of reading by now :)
 |
| I chose this colourful picture for my second try because it looked easier than the next two :) |
 |
I decided not to include all the background detail in this picture, so I just made up my own random lines for the picture's background when I traced it.
I traced and cut one colour at a time, and laid the pieces out in more or less the correct position on a sheet of white paper so I wouldn't lose track of where they should go. All the tiny curves in this picture were traced and cut as straight lines because giant art knife blade is giant. |
 |
I used white, blue, 3 shades of yellow and two shades of red.
Everything is glued on a black sheet of paper. |
 |
This one's my favorite!
Also, it's more like the typical papercut art that you'd see around the internet because the design is cut from a single sheet of paper on a contrasting background. I used a super detailed picture for this because i wanted it to look interesting even though it has no colour. |
 |
| So I traced the picture, making sure that all the black areas were joined so that the whole picture would be cut from one continuous sheet of paper |
 |
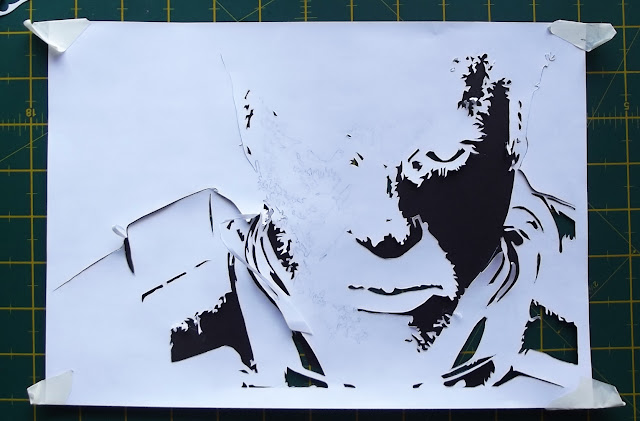
| I traced it onto white paper so that I could see the lines and then taped it to a sheet of black paper and cut through both layers at the same time. Here you can see I started to cut small pieces from his shoulder. |
 |
| This picture took much longer than all of the others because of all the tiny cuts and fine detail |
 |
| Here's what it looked like when I finished cutting along all the lines and separated it from the white sheet. Some of the cuts didn't go through both sheets of the paper and so I had to cut the pieces loose. |
 |
| By the time I got to this one I was confident enough to try and cut tiny curves and also go for a proper layered effect. I edited the picture until it could be done with black, white, and 3 shades of grey. |
 |
| I traced out and cut one layer at a time |
 |
In order to cut the dark grey paper I traced the shapes onto white paper again and taped the two pages together so I could see the lines.
The final picture is on a sheet of black paper, with the first layer in dark grey, then medium grey on top of that, then light grey, and white on the top layer. |
Thank you for visiting!! :D
Update: I got a bit better at it and figured out how to do it without tracing anything. Also, it turns out a scalpel works WAY better than a huge art knife blade. So I even copied a photo of actual people's faces and some other stuff. You can see it here
here


WOW. This must have taken forever do do.....
ReplyDeleteAbout 4 days or so :) I did it in the evenings after work :)
DeleteThats awesome!
ReplyDelete